Trezor.io/Start® | Starting Up Your Device | Trezor®
At Trezor.io/start, you'll find a simple and straightforward process to ensure your digital assets are safe. This guide will walk you through the steps, making it easy for you to connect your
Trezor.io/Start® | Starting Up Your Device | Trezor®
In a world where digital assets are gaining value and popularity, keeping your cryptocurrency safe is more important than ever. Trezor® is one of the most trusted names in the crypto security space, offering reliable and user-friendly hardware wallets for individuals who want full control over their assets.
Whether you’re a beginner or a seasoned investor, the safest place to begin your journey is at the official site: Trezor.io/Start®. This guide will walk you through everything you need to know about starting up your Trezor® device, setting it up securely, and using it to manage your crypto confidently.
What Is Trezor®?
Trezor® is a hardware wallet that securely stores your private keys offline, away from the internet and potential cyber threats. Created by SatoshiLabs®, the Trezor® wallet is considered a pioneer in crypto hardware security. It enables users to safely store, send, and receive Bitcoin®, Ethereum®, and thousands of other cryptocurrencies and tokens.
There are currently two main models:
Trezor Model One® – perfect for beginners
Trezor Model T® – a premium touchscreen device with advanced features
With either model, your private keys never leave the device. Every action, from transactions to settings, must be confirmed on the physical wallet itself, keeping you in full control.
Why Use Trezor.io/Start®?
The internet is full of guides and videos about setting up crypto wallets, but not all of them are reliable or safe. Trezor.io/Start® is the official setup page for Trezor® devices. It ensures you are using authentic tools and up-to-date software, avoiding fake sites and apps that could compromise your crypto.
Here’s what you can expect at Trezor.io/Start®:
Verified firmware and wallet software downloads
Step-by-step device initialization
Guides on creating and backing up your recovery seed
Tips for safe storage and advanced security options
By using Trezor.io/Start®, you eliminate the risk of downloading malicious software or falling for phishing scams.
Getting Started With Your Trezor® Device
Setting up your Trezor® wallet is a quick and easy process when done through the official site. Here’s how to get started safely.
Step 1: Unbox and Inspect Your Device
When you receive your Trezor® wallet, make sure the packaging is sealed and hasn’t been tampered with. Trezor® devices come with anti-tamper seals and should look brand new. Inside the box, you’ll find:
Your Trezor® device
USB cable
Recovery seed cards
Getting started card
Stickers and accessories
If anything seems unusual, stop and contact Trezor® support immediately.
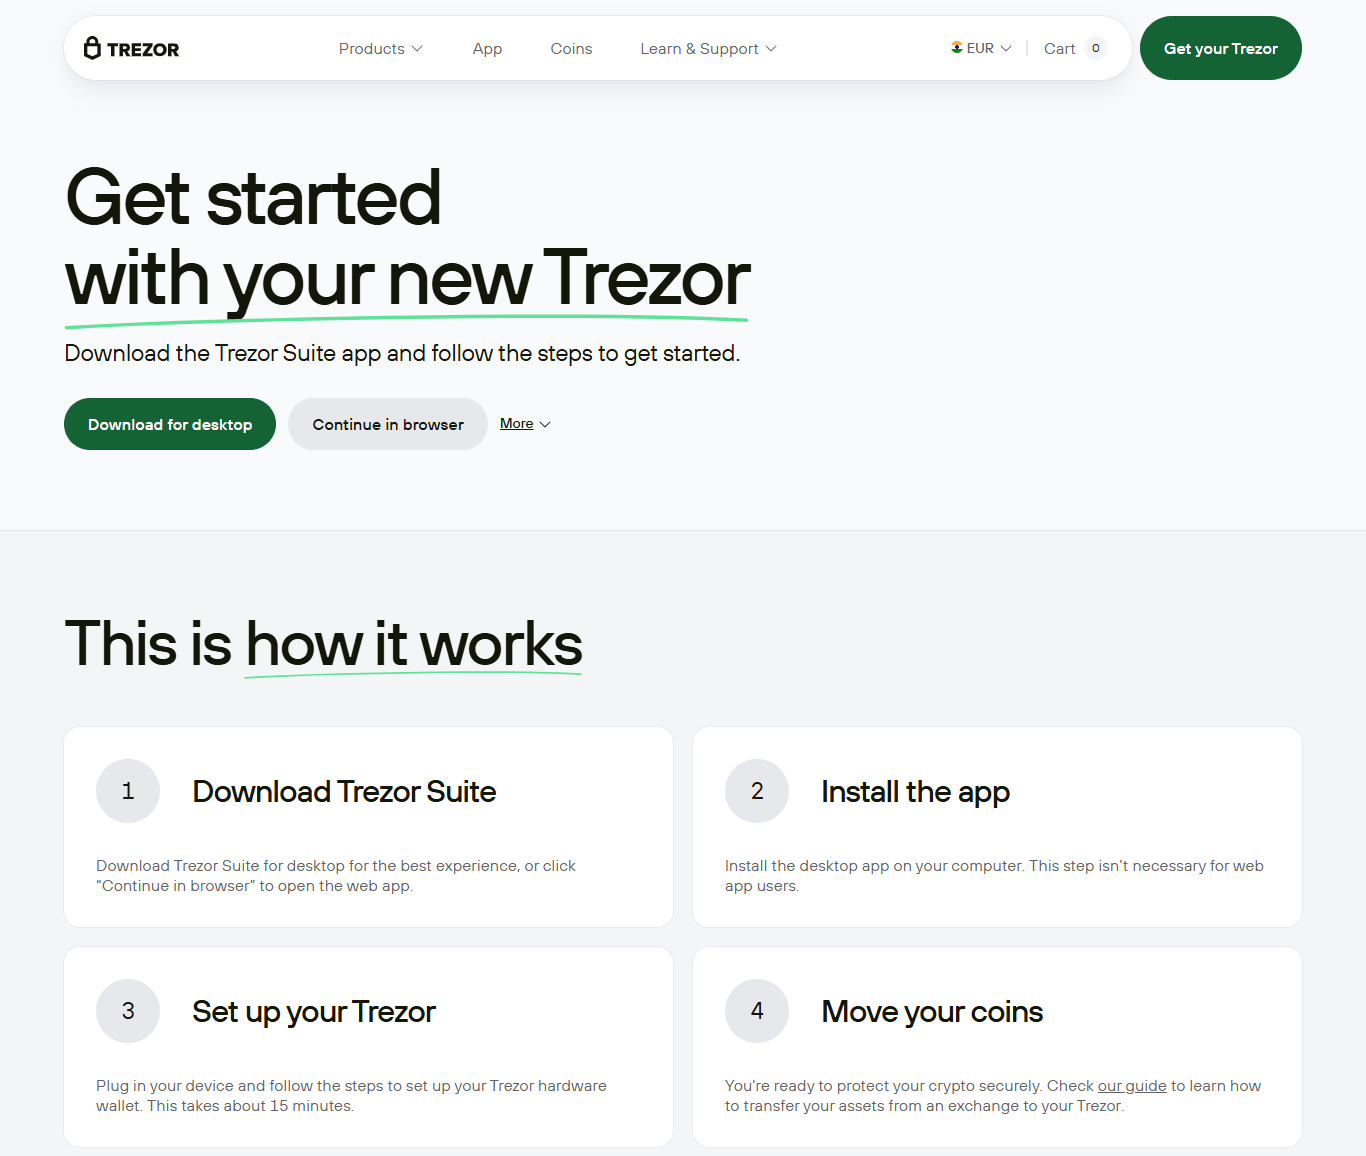
Step 2: Visit Trezor.io/Start®
On your computer or smartphone, open your browser and go to Trezor.io/Start®. This is the official and safest place to begin the setup.
The page will ask you to select your device (Trezor Model One® or Trezor Model T®) and guide you to download Trezor Suite®, the desktop or browser-based interface used to interact with your wallet.
Step 3: Install and Launch Trezor Suite®
Trezor Suite® is your secure interface for managing your crypto. It allows you to:
Create or restore wallets
View balances and transaction history
Buy, sell, or exchange crypto
Enable security features like passphrase protection
Download and install Trezor Suite® from the official link provided. Then connect your device using the included USB cable.
Step 4: Install Firmware
On first use, your Trezor® will prompt you to install firmware. This ensures you are running the latest secure version provided directly by Trezor®. Only install firmware when prompted through Trezor Suite®—never from unknown sources.
Step 5: Create a New Wallet
After firmware installation, Trezor Suite® will prompt you to create a new wallet. Select “Create new wallet,” and your device will generate a unique 12- or 24-word recovery seed.
Write this recovery seed down on the provided seed card. Do not store it digitally or share it with anyone. This seed is your ultimate backup—if your device is lost, damaged, or stolen, the recovery seed will allow you to restore access to your funds on a new device.
Step 6: Verify and Confirm Recovery Seed
Trezor® will ask you to confirm the seed words on your device screen to ensure they were written down correctly. This step cannot be skipped and is crucial for long-term security.
Once confirmed, your wallet is fully initialized and ready to use.
Managing Crypto With Trezor Suite®
Once your device is set up, you’ll use Trezor Suite® to manage your assets. With Trezor Suite®, you can:
Send and receive over 1,000 cryptocurrencies
Swap tokens using integrated exchanges
Track portfolio performance
Use advanced tools like coin control and labeling
Connect to decentralized apps (dApps)
Every transaction must be manually confirmed on your Trezor® device, ensuring maximum protection.
Safety and Best Practices
Always use Trezor.io/Start® for setup and downloads
Never share your recovery seed—Trezor® will never ask for it
Keep your recovery seed in a secure, offline location
Enable additional security features like passphrase protection
Regularly update your firmware via Trezor Suite®
Staying vigilant and following best practices ensures your digital assets remain protected.
What If You Lose Your Trezor®?
If your Trezor® is lost, stolen, or damaged, your funds are still safe—as long as you have your recovery seed. To recover your wallet:
Purchase a new Trezor® device
Select “Recover wallet” during setup
Enter your 12- or 24-word recovery seed
Regain full access to your funds and transaction history
This is why the recovery seed is the most important part of your crypto security strategy